We have all at some point when deleting pictures accidentally deleted the precious pictures, we've accidentally deleted a whole album of...
We have all at some point when deleting pictures accidentally deleted the precious pictures, we've accidentally deleted a whole album of vacation pictures or maybe your friend or child somehow got their hands on your smartphone and wiped your camera roll clean.
When it comes to technology, there is always a way to recover lost items.
One thing to keep in mind though, is that once you've deleted the pictures or other files, it is safe not to use your device until the data is recovered. When a picture is deleted, it is not deleted permanently, but rather it just opens up space for more data. Any operation on your device then; including taking photos can generate new data and overwrite that space, which would make lost data unrecoverable.
Apple made photo-recovery easy with iOS 8, but when it comes to recovering deleted photos from Android phones and memory cards you'll need a little assistance from a third-party application. Though, some Android device now come with recovery features. E.g Gionee M6, when you delete a picture on that phone, it will be stored in a virtual memory space and after 7 days, it will then be permanently removed.
Whether you are using an iPhone or an Android phone, this guide will help you recover deleted photos from your devices.


You can get EaseUs Data Recovery app on Get Into Pc
DiskDigger is an application that helps you in recovering deleted and lost pictures from your Android devices.
DiskDigger photo recovery app is very simple to use and works even without your device being rooted. It can undelete and recover lost pictures from your SD card and internal memory. Although if you have a rooted device, the app will search all of your device’s memory for any trace at all of photos as well as videos. If your device is not rooted, the app does a limited scan by searching your cache and thumbnails. So, in a way, you’re getting your pictures back.
You can upload your recovered files directly to Google Drive, Dropbox, or send them via email. The app also allows you to save the files to a different local folder on your device.
To use the app:
Apple made it extremely easy to recover deleted photos in its latest OS.
This is how to do it:
When it comes to technology, there is always a way to recover lost items.
One thing to keep in mind though, is that once you've deleted the pictures or other files, it is safe not to use your device until the data is recovered. When a picture is deleted, it is not deleted permanently, but rather it just opens up space for more data. Any operation on your device then; including taking photos can generate new data and overwrite that space, which would make lost data unrecoverable.
Apple made photo-recovery easy with iOS 8, but when it comes to recovering deleted photos from Android phones and memory cards you'll need a little assistance from a third-party application. Though, some Android device now come with recovery features. E.g Gionee M6, when you delete a picture on that phone, it will be stored in a virtual memory space and after 7 days, it will then be permanently removed.
Whether you are using an iPhone or an Android phone, this guide will help you recover deleted photos from your devices.
RECOVER PICRUTES AND OTHER FILES USING EASEUS DATA RECOVERY APP
Step 1: Launch the Program and Start Scanning
First of all, please download the program and install it on your computer (DO NOT install it on the disk where you lost your data, otherwise those lost files and data will be overwritten.).
Select a Location to Start Finding Data
Please select a location to start finding data, like Desktop, Windows Libraries, Existing partitions, Lost partitions (This option is suitable for the situation of a data loss caused by deleting a partition, losing a partition or re-partition. Our program will read the partition table and list all the deleted partition info under it.)

Step 2: Scan Your Computer or Device
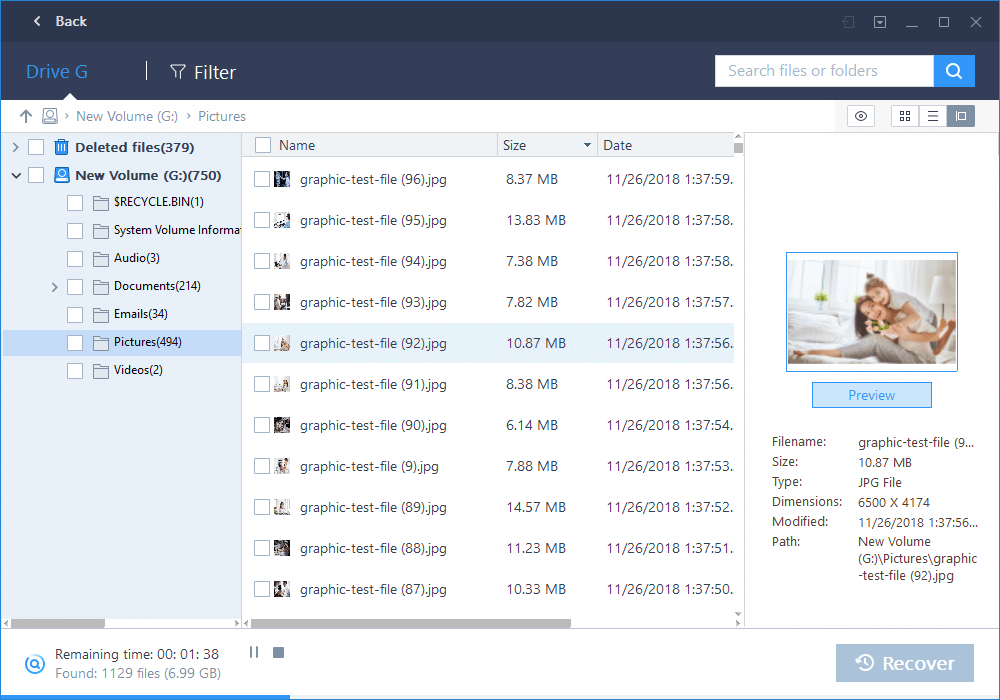
In the upper part of the program is the process bar displaying the status of the recovery. after the process bar is the estimated remaining time.

Technically the first scan will be very quick. Our program will first list all the files that are simply deleted or cleaned from the recycle bin.
After the quick scan, our program will perform a new sector by sector scan automatically, which will take longer than the first scan. Please be patient and do not interrupt it in the middle of the process if not necessary.

Step 3: Preview and Recover the Files
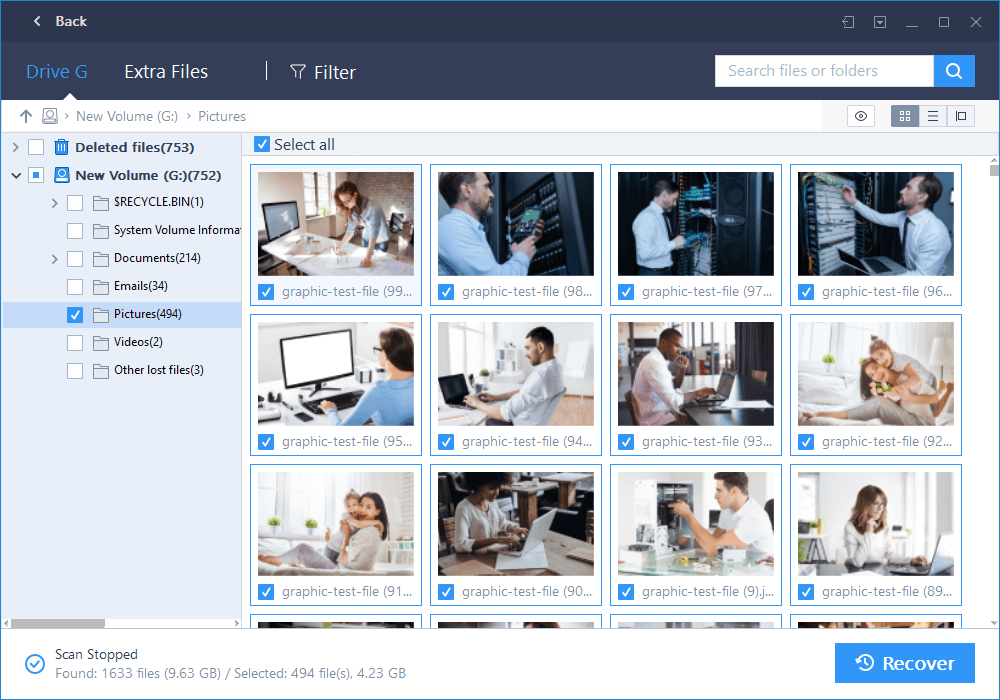
The scan result interface is divided into 3 parts. At the left is the Directory Tree list. The window in the middle displays all the files and folders under the folder selected in the left window with more info (date, type, size and so on). The window at the right side displays a thumbnail and info for the file selected in the middle window. It provides a Preview option to preview some specific file types in the program.

After the preview or search, you can select the targeted files and press Recover button to recover and save them on your computer or storage device (Please DO NOT save the files into the drive or device where you lost the data).

Moreover, you can export the scan results by clicking Export Scan Status, and you can Import the scan results to perform another recovery without scanning again at any time by clicking Import Scan Status.

You can get EaseUs Data Recovery app on Get Into Pc
To Recover Deleted Pictures on Android Device
There are various apps in the Google Play Store that will help you recover your lost data. You can try and experiment with several to see which one is better, but I will recommend app called DiskDigger, it's fast and easy to use.DiskDigger is an application that helps you in recovering deleted and lost pictures from your Android devices.
DiskDigger photo recovery app is very simple to use and works even without your device being rooted. It can undelete and recover lost pictures from your SD card and internal memory. Although if you have a rooted device, the app will search all of your device’s memory for any trace at all of photos as well as videos. If your device is not rooted, the app does a limited scan by searching your cache and thumbnails. So, in a way, you’re getting your pictures back.
You can upload your recovered files directly to Google Drive, Dropbox, or send them via email. The app also allows you to save the files to a different local folder on your device.
Download DiskDigger photo recovery free version from Play Store Here
Download DiskDigger Pro file recovery from this #link
- Open the DiskDigger app and tap "Start Basic Photo Scan", the screen will be populated with a list of most recent deleted files.
- When you see the photo you want to recover simply select it and hit "Recover..." button at the top.
- The app will then ask you where you want to save the photo and after you pick its destination your photo should appear back in your memory card or phone system.
To Recover Deleted Pictures on iPhone
Apple made it extremely easy to recover deleted photos in its latest OS.
This is how to do it:
- Access your Photos App and go into your albums.
- Scroll to the bottom and tap on "Recently Deleted."
- In that photo folder you will find all the photos you have deleted within the last 30 days. To recover you simply have to tap the photo you want and press "Recover." You can also press "Delete" to get rid of that photo permanently.


COMMENTS